Managing Hybrid Identities with Microsoft Azure

Today, businesses are becoming a combination of on-premises and cloud applications. Users require access to those applications which are hosted both on-premises and in the cloud. Managing users both on-premises and in the cloud poses challenging scenarios.

Microsoft’s hybrid identity solutions span on-premises and cloud-based capabilities, creating a single user identity for authentication and authorization to all resources, regardless of location or device.

Azure AD Connect integrates any user who is present or being created in an on-premise Active Directory to Azure AD. This means you have a single user identity for accessing resources present on-premise, in Azure, O365 & your SaaS applications.


Business Benefits of Hybrid Identities:

  • An increase in productivity by providing access anywhere, anytime
  • Create and manage a single identity for each user across all your data center-based directories, keeping attributes in sync and providing self-service and SSO for users.
  • Keep resources productive with self-service password reset and group management for both data center and cloud-based directories.
  • Organizations have complete visibility and control over security and monitoring to help reduce inappropriate user activity and spot irregularities in user behaviors
  • Enforce strong authentication to sensitive applications and information with conditional access policies and multi-factor authentication.
  • Federate identities to maintain authentication against the data center-based directory.
  • Provide SSO access to hundreds of cloud-based applications.


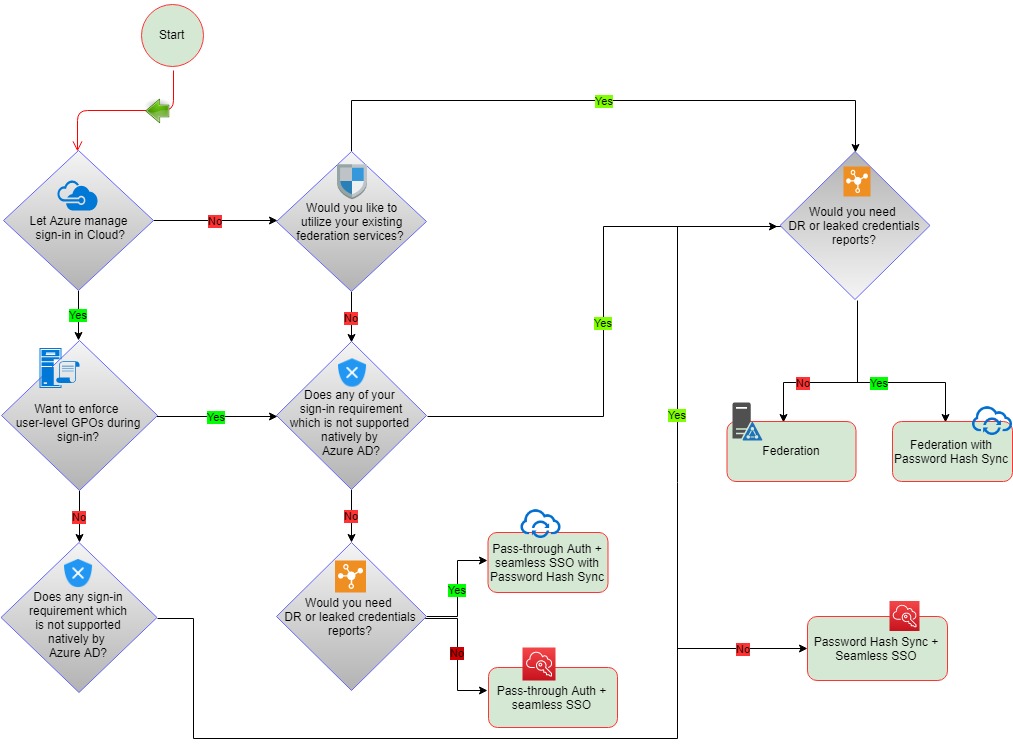
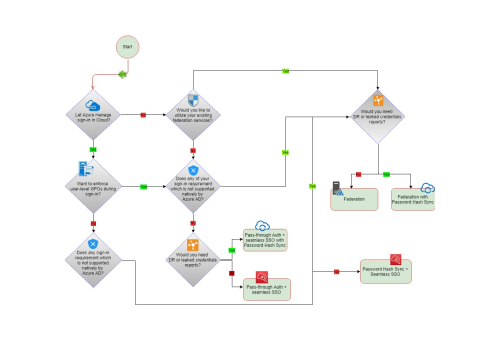
The Three Hybrid Authentication Solutions:

While hybrid identity may seem like a complex issue when it is up and running, it makes accessing data and services both internal and external while collaborating with partners and customers much simpler. To achieve hybrid identity with Azure AD, three authentication methods can be used:


1. Password Hash Synchronization (PHS):

Password hash sync is the simplest way to enable authentication for on-premise AD objects in Azure AD. Users can use their existing on-prem credentials for accessing cloud-based applications on Azure. Active Directory DS stores the password in a hash form which is synced to Azure AD. When a user tries to login to Azure AD, the password is run through a hashing process and the hashed value is matched with the hash value present on Azure AD. If the hash values match, the user is allowed access to the resources.


2. Pass-Through Authentication (PTA):

Azure Active Directory (Azure AD) Pass-through Authentication allows your users to sign in to both on-premises and cloud-based applications using the same password. While deploying the Pass-through Authentication solution, lightweight agents are installed on your existing servers. These agents should have access to the on-premise AD domain controllers and outbound access to the internet. Network traffic is encrypted which is limited to authentication requests only.


3. Federation Authentication (AD FS):

With the Federation authentication method, you can federate your on-premises environment with Azure AD and use this federation for authentication and authorization. This sign-in method ensures that all user authentication occurs on-premises. Azure AD redirects the users to Active Directory Federations Services (ADFS) as the authenticated domain configured as a federated domain. The ADFS server authenticates the user with on-premise AD and returns a security token to authenticate with Azure AD. The configuration of this solution is much complex as it would require one or more ADFS Proxy servers, one or more ADFS Servers and SSL certificates for implementations.


Why SNP?

At SNP, we help you choose and implement a hybrid identity solution which aligns with your information technology roadmap. For more information, contact us here.

Achieve Cloud Native Network Security with Azure Firewall

Cloud developers and IT teams struggle to stay ahead of challenges protecting users, data, and applications from today’s cybersecurity attacks. With Azure Firewall, network security policies can be enforced while allowing companies to take advantage of the scale and simplicity of Azure.


Azure Firewall:

The Azure Firewall is fully integrated with the Azure platform, portal UI, and services. It offers fully native firewall capabilities for all your virtual network resources, and it includes built-in high availability that lets you scale your resources automatically. Azure’s Network Security Groups (NSG) are able to allow/deny and filter TCP/UDP traffic.


How it works:

IT administrators can create connectivity policies using application and network filtering rules and enforce the policies across multiple subscriptions and virtual networks. The new service is built to work with Azure’s existing security services to strengthen and enhance the entire security experience.


Azure Firewall offers advantages like:

  • Built-in high availability: No additional load balancers are required, and there is nothing you need to configure.
  • Unrestricted cloud scalability: Azure Firewall scales automatically to accommodate changing network traffic flows, so IT administrators never need to budget for peak traffic periods.
  • Application FQDN filtering rules: Users can limit outbound HTTP/S traffic to a specified list of fully qualified domain names (FQDN), including wild cards. This feature does not require SSL termination.
  • Network traffic filtering rules: Centrally create “allow” or “deny” network filtering rules by source and destination IP address, port, and protocol. Azure Firewall is fully stateful, which enables it to distinguish legitimate packets for different types of connections. Plus, rules are enforced and logged across multiple subscriptions and virtual networks.
  • FQDN tags: FQDN tags make it easy to allow well known Azure service network traffic through the firewall.
  • Outbound SNAT support: All outbound virtual network traffic IP addresses are translated to the Azure Firewall public IP address (Source Network Address Translation). The firewall can identify and allow traffic originating from a virtual network to remote Internet destinations.
  • Inbound DNAT support: Inbound network traffic to firewall public IP address is translated (Destination Network Address Translation) and filtered to the private IP addresses on virtual networks.
  • Azure Monitor logging: All events are integrated with Azure Monitor, allowing IT administrators to archive logs to a storage account, stream events to Event Hub, or send them to Log Analytics.


For more information on Azure Firewall, contact SNP Technologies here.

Jenkins At Your Service On Azure

If you’ve been following developments at Microsoft during the tenure of CEO Satya Nadella, it is likely you have heard him say “Microsoft Loves Open Source!”

Here at SNP, we did not need to be convinced of the value open source tools bring to our customers. A case in point is Jenkins, an open source automation server that has been a leader in the DevOps tooling marketplace. For several years, Jenkins has been SNP’s go-to software for continuous integration and continuous delivery (CI/CD) pipelines.

For its part, Microsoft is also a Jenkins fan, having an entire section of its Azure documentation devoted to Jenkins on Azure. As well, there are tutorials to cover specific use cases in the Azure context, such as to deploy from GitHub to Azure Kubernetes Service (AKS) with Jenkins.

To get started with Jenkins in Azure, Microsoft provides a guide to creating a Jenkins server on an Azure Linux VM from the Azure portal. This is all well and good, but this requires love and attention to a virtual machine, and that may not be your cup of tea. Jenkins as a service may be more to your liking. For this one can deploy Jenkins on Azure Web App for Containers. (At this time, put on your finest British accent, and repeat after me, “Jenkins at your service on Azure, Madam”.)

In the open source spirit, SNP has contributed a Docker image solution on GitHub titled Jenkins on Azure Web App for Containers. You can fork the Git repo to use as the basis for your own container image.


What follows is a step by step guide to deploy Jenkins on Azure Web App for Containers.

Get the Git Repository

Visit Jenkins on Azure Web App for Containers to clone or fork the repo. Read the README.md file, of course, and review the files in the repository.

Build an Image, Push to a Container Registry

The following steps assume you have Docker installed in your development environment.

In your favorite terminal, e.g. Git Bash, switch to the directory in which you cloned the repository.


At the command link, enter the Docker build command, for example:

docker build -t mikesacr.azurecr.io/jenkinsonazure:v1 .


List images to verify the build:

docker images


Run the image locally, for example:

docker run -p 8080:8080 mikesacr.azurecr.io/jenkinsonazure:v1


Push the image to a container repository. For example, using Azure Container Registry:

docker login mikesacr.azurecr.io -u myusername docker push mikesacr.azurecr.io/jenkinsonazure:v1


Once complete, a sha256 value with a unique identifier for your image is displayed, for example:


This sha256 is also visible in the Azure Portal, for example:

Deploy your Container Image on Web App for Containers

The following steps assume you have an Azure Subscription and an App Service Plan.

Create a Web App for Containers Resource

In Azure Portal, click “Create a resource”, then search for “Web App for Containers”:

This will open a Web App for Containers resource information blade. Click on the “Create” button at the bottom of the blade:

Next, fill in values for the parameters required to create your resource.

  1. Enter a unique App name
  2. Select your Azure Subscription
  3. Select a Resource Group. I recommend a new resource group because the life cycle of your Jenkins app will probably be independent of that of other applications.
  4. Select “Linux” as your OS
  5. Select an App Service plan/Location. If you have not already created a Service Plan, that’s OK. A new one can be created from here. The Service Plan should be in the same region as the Resource Group. Check this list of locations that support the Web App for Containers.
  6. Configure container. Here we identify the container registry and container image to be deployed to the Web App. Click the “Apply” when done filling in this blade.
  7. Click the “Create” button

Note: Alternatively, the preceding steps can be accomplished using the Azure CLI.

When the deployment completes, you should see your new Resource Group and new Web App resource in Azure Portal. Click on the Web App Resource. There are a few steps you need to complete before running your Jenkins application, as noted in the README.md file.

Web App Configuration Steps

  1. Ensure that the WEBSITES_ENABLE_APP_SERVICE_STORAGE app setting to “true” in the Application settings blade of the Web App.Application setting for WEBSITES_ENABLE_APP_SERVICE_STORAGE
  2. Manually create the jenkins_home directory in the Web App /home directory
    before you run the container and install Jenkins. This can be done from the Kudu Bash screen or from an FTPS session.Screen capture of web app home directory from FileZilla FTP client.

Run your Jenkins Container

From the Web App Overview blade, click on the URL to run your Jenkins instance. After a brief initialization period, you should be presented with the Unlock Jenkins screen.

You are on your own from here, but keep in mind the “Gotchas” we have documented in the repo’s README.md file.

Jenkins Unlock Jenkins screen

In Closing

If you have questions and suggestions to improve the solution, we are happy to receive issues and pull requests. Contact SNP here.