SNP’s Hybrid Cloud Adoption Framework for Azure

SNP’s Hybrid Cloud Adoption Framework for Azure provides a structured approach to help organizations transition to a hybrid cloud model effectively. This framework is designed to streamline the adoption process, ensuring alignment with business goals while leveraging the capabilities of Azure. Here’s an overview of the framework’s key components:

Assessment and Strategy Development

  • Current State Analysis: Evaluate the existing IT landscape, including applications, infrastructure, and data. Identify workloads that are suitable for migration to the cloud.
  • Business Objectives Alignment: Understand the organization’s goals, such as cost savings, scalability, or improved agility, to align the cloud strategy with overall business objectives.

Design and Architecture

  • Hybrid Architecture Blueprint: Create a detailed architecture plan that incorporates both on-premises and Azure resources. Define how data and applications will interact across environments.
  • Best Practices: Implement Azure best practices for security, compliance, and performance to ensure a robust hybrid architecture.

Migration Planning

  • Workload Prioritization: Prioritize workloads for migration based on factors like complexity, business impact, and readiness.
  • Migration Pathways: Determine the migration approach—whether lift-and-shift, refactoring, or rearchitecting—and create a detailed migration plan.

Implementation and Deployment

  • Execution: Implement the migration plan, moving workloads and data to Azure as per the established timelines.
  • Automation: Leverage Azure tools for automating deployment and configuration, reducing manual effort and minimizing errors.

Integration and Optimization

  • Seamless Integration: Ensure that on-premises systems and Azure services are integrated smoothly for consistent data flow and application performance.
  • Performance Tuning: Continuously monitor and optimize workloads in Azure to ensure they perform efficiently and meet user expectations.

Governance and Compliance

  • Policy Framework: Establish governance policies to manage resources across hybrid environments, ensuring compliance with regulatory requirements.
  • Security Posture Management: Implement Azure Security Center and other tools to monitor security and compliance across the hybrid environment.

Monitoring and Support

  • Continuous Monitoring: Use Azure Monitor and Azure Application Insights to track performance and health of both on-premises and Azure resources.
  • Support Mechanisms: Set up support structures for ongoing management, maintenance, and troubleshooting of hybrid cloud environments.

Innovation and Evolution

  • Continuous Improvement: Foster a culture of continuous improvement by regularly reviewing and updating the hybrid cloud strategy to adapt to changing business needs.
  • Emerging Technologies: Stay informed about new Azure features and services that can enhance the hybrid cloud strategy, such as AI, machine learning, and advanced analytics.

Conclusion

SNP’s Hybrid Cloud Adoption Framework for Azure provides organizations with a comprehensive roadmap for successful hybrid cloud adoption. By focusing on assessment, design, migration, integration, governance, and continuous improvement, organizations can maximize the benefits of a hybrid cloud strategy, ensuring scalability, agility, and enhanced performance while aligning with their business objectives. Contact SNP here.


Step-by-Step Guide to Migrating Aderant Legal Software System to Azure

The legal or law industry has changed a great deal in recent years. Increasing client demands, globalization, and greater IT complexity have all affected firm profitability. The requirement to have a comprehensive, agile, and user-friendly financial and practice management system to manage operations and support key decision making has now moved beyond a functional need to a strategic requirement. Therefore, choosing the right system demands much more than comparing software functionality.

Often when law firms consider the idea of “moving to the cloud,” they think it is changing their existing software entirely, abandoning their current legal software and switching to a web-based application. But this is not required with Aderant. Law firms can keep their existing software and still get the benefits of the Cloud via a fully managed private cloud platform.

If you are not already familiar, Aderant is  a fantastic tool that assists law firms in handling their invoicing, payments received, managing their cases, and generating helpful financial reports to determine the fiscal health of the firm.


Getting Started with SNP Technologies Inc.

A well-planned, well-executed implementation minimizes disruption and avoids negative consequences. If you are like most law firms, your team has not implemented a new practice management system in many years. Selecting a partner with experience is important to your success. This is where we come in.

  • The SNP professional services teams have extensive experience of moving data, on-premises servers, applications, and other business elements used by law firms to the Cloud.
  • Our solution experts come with years of experience of  implementing practice management systems to Azure for many firms like yours.
  • Our services professionals have extensive knowledge and deep understanding of the challenges a law firm will face when they take on a system conversion.
  • SNP will guide you every step of the way and help you to stay on track, meet your business objectives, and get your system up and running on time and within budget.


In this blog, we will walk you through some of the challenges you may come across while migrating your Aderant system to the Cloud and how SNP can help you overcome them to achieve better and reliable performance while making optimal use of your resources.

Because Aderant is most often installed on physical servers located within a law office, all the components are connected via LAN, this directly impacts the network, storage connectivity mechanism and performance of the system causing bottlenecks while migrating to Azure.


A Better Way: Responsive, Knowledgeable Product Support Keeps your Firm Up & Running

The best way to move Aderant to the cloud is to leverage a fully managed private cloud platform from Azure. You get to avoid the hassle that often comes with not understanding how to install or manage all the components required. You get to just enjoy using Aderant from the cloud. A fully managed private cloud from Azure results in more uptime as well as knowing that you have a team of experts on your side to install and manage Aderant while providing you with the support you need. How we do it:

VIRTUAL MACHINE & DISK PERFORMANCE:

Key factors to consider while selecting the resource to host your Aderant system:

  • How the disk model and size you choose defines the Input Output (IO) cap
  • What generation of the virtual machine and size define the Input Output (IO) cap?
  • How the virtual machine and disk combination affects the total Input Output (IO) cap
  • How host caching feature affects the disk Input Output cap and how it improves overall Input Output cap of the virtual machine.

Azure virtual machines have input/output operations per second (IOPS) and throughput performance limits based on the virtual machine type and size. The disks have their own IOPS and throughput limits. Aderant’s efficient performance depends on size of the VM, type and size of disks which we select.

Here we cover several scenarios which are considered while moving to Azure:

Scenario 1: Aderant hosted on an on-premises data center

Scenario 2: How application performance gets capped due to disk input output capping

Aderant makes a query that need 25,000 IOPS. As it is a D16s_v3 and it has 25600 IOPS limit, IOPS requested by application are allowed. The 25,000 IOPS requests are broken down into four different requests. 8,000 IOPS are requested to each of 3 data disks and 1000 IOPS to OS disk. As shown in above diagram, OS disk is P15 with a limit of 1100 IOPS and as application requested 1000 IOPS, it responds to the request with 1000 IOPS. Data disk for temp DB is P40 with a limit of 7500 and as application requested 8000 IOPS, it responds with 7500 IOPS only. Data disk for Logs is P50 with a limit of 7500 and as application requested 8000 IOPS, it responds with 7500 IOPS only. Data disk with DB is P60 with a limit of 16000 and as application requested 8000 IOPS, it responds with 8000. The application’s performance is capped by the attached disks, and it can only process 24,000 IOPS.

  • VM Size – D16s_v3
  • OS Disk – P15 (256 GB with 1100 IOPS)
  • Data Disk for DB – P60 (8TB with 16000 IOPS)
  • Data disk for Logs ­– P50 (4TB with 7500 IOPS)
  • Data disk for TempDB – P40 (2TB with 7500 IOPS)

How application performance gets capped due to disk input output capping

Scenario 3: How application performance gets capped due to VM IO capping

Aderant makes a query that need 25,000 IOPS. As it is a D8s_v3 and it has 12800 IOPS limit, IOPS requested by application are capped at 12800. Though the attached disks combinedly can handle the IOPS requested by application, it does not perform due to VM IOPS limit.

  • VM Size – D8s_v3
  • OS Disk – P15 (256 GB with 1100 IOPS)
  • Data Disk for DB – P60 (8TB with 16000 IOPS)
  • Data disk for Logs ­– P60 (8TB with 16000 IOPS)
  • Data disk for TempDB – P60 (8TB with 16000 IOPS)

How application performance gets capped due to VM IO cappingBy looking at the above two examples, anyone can conclude that application performs better using the disk configurations in example 2 and using VM configuration in example 1. But how can you further refine these configurations to cut down cost as using D16s_v3 is 100% more expensive as compared to D8s_v3?


Scenario 4: Hosting the caching feature for disks to make the application work with D8s_v3

Aderant makes a query that need 25,000 IOPS. As host caching is enabled on the data disk for logs and the other data disk for temp DB, IOPS request is divided into two sets. As these both data disks are receiving 16000 IOPS requests from application and as host caching is enabled on these disks, they can serve the 16000 IOPS which are not counted into 12800 uncached limit of VM.

Azure VMs enabled with host caching has two different IOPS limits. Cached IOPS limit and Uncached IOPS limit. D8s_v3 has max cached limit of 16000 IOPS and uncached limit of 12800.

  • VM Size – D8s_v3
  • OS Disk – P15 (256 GB with 1100 IOPS)
  • Data Disk for DB – P60 (8TB with 16000 IOPS)
  • Data disk for Logs ­– P60 (8TB with 16000 IOPS)
  •  Data disk for TempDB – P60 (8TB with 16000 IOPS)

Hosting the caching feature for disks to make the application work with D8s_v3.

APPLICATION & SERVER LOAD BALANCING FOR ADERANT

You may be using 3rd party load balancers like Kent, F5 or NetScaler to facilitate load balancing for Aderant application servers. You may also be considering whether you need to have the same appliance deployed in Azure which will be easy for your administrators to manage or replacing it with Azure native load balancer. Majority of these load balancers mask the client IP with load balancer IP and presents it as the source to the application servers. Due to this you may not face an issue while opting persistence, but can you do same with Azure load balancer?

Yes. It is possible. You can use Azure standard load balancer with session persistence enabled for client IP and it works great with Aderant app servers.


TESTING

Planning and creating a testing strategy for such a performance sensitive application is key to successful migration. Testing with limited load and limited users will give an idea about application functionality but it does not give you a choice to test the application reaction for usual heavy load created on daily basis. Identify the test cases for various Aderant expert modules, run the test cases in production environment, make a note of time, execute the same test cases in test environment and performing a comparison will give insights on the performance of the system. By performing similar activity as above by on boarding few users to test environment and asking them to perform their regular activities will give you the information and data you need to fine tune the infrastructure to be production ready.


CONCLUSION: MODERN TECHNOLOGY + NON-DISRUPTIVE MIGRATIONS + GOOD CUSTOMER EXPERIENCE = SUCCESS

SNP’s dedicated professional services and support teams come with years of experience to help you implement practice management systems that can easily be configured to meet your exact business requirements with ongoing support you need to maintain peak operations.

SNP is a partner you can trust to ensure that your financial and practice management system provides the functionality you need to run your firm and support your strategic goals for years to come. The operational benefits that our clients gain include:

  • Access to cutting-edge functionality with Azure.
  • Reduced integration issues.
  • Extremely responsive and knowledgeable client support.
  • The ability to participate in new product development.
  • Eliminating the hassle of working with multiple vendors.
  • Faster deployment and higher user adoption rates.
  • Lower total cost of ownership.


These benefits then lead directly to the things that really impact your success:
  • Responding to client requests (new pricing models, billing information, matter status, etc.) faster.
  • Getting actionable performance management data to accurately track performance and enable smart decision making.
  • A stronger infrastructure that enables you to better leverage new opportunities for the success of both your partners and your staff.


If you are considering a new practice and financial management system or your law firm already uses Aderant as a practice management tool and you’d like to learn more about hosting it from Azure, contact SNP, we would love to help you explore how Azure cloud can benefit your law firm!

SNP Collaborates with Citrix to Deliver an On-demand Webinar on How You Can Migrate your Citrix Environment to Azure

It is anticipated, by 2023, the Desktop-as-a-Service (DaaS) market is expected to grow by 29%, as more and more companies reap the benefits of a cloud workspace. But what exactly are these benefits and how do they differ from those currently seen on-premises?

For businesses adopting a cloud-first strategy, desktop migration is the next natural step. As Citrix and SNP Technologies continues to forge a winning partnership with Microsoft Azure, there is no better time to make the leap to securer, cost effective, and more flexible desktop delivery.

Our solution experts will show you:

  • How you can seamlessly deliver and manage the users’ apps, desktops, data, and devices.
  • Successfully and most efficiently scale desktops and applications to the cloud.
  • Build a strategy for migrating infrastructure and virtual desktops to the cloud.
  • How to proactively test the VDI related user experience from all your remote locations.
  • Get insights to optimize and right-size your infrastructure, avoid downtime and improve datacenter efficiency, invest wisely and reduce the cost and complexity of IT operations management.
  • Drill down into the technical aspects of deployment, including recommendations on Azure compute, network, and storage, key Citrix infrastructure components, and Azure business continuity.
  • How to optimize the performance and availability of hosted desktops and applications.


Watch the webinar on-demand


From DevOps to DevSecOps

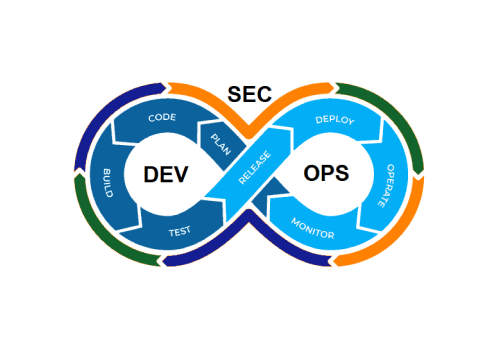
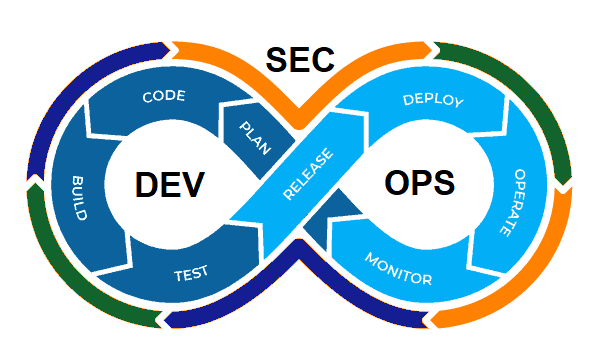
DevSecOps (Development, Security & Operations) is a transformational shift in the digitally evolving IT world which incorporates secure culture, practices, and tools to drive visibility, collaboration, and agility of security into each phase of the DevOps pipeline.

Why DevSecOps is crucial for your business:

  • Continuous Security- DevSecOps uses automated security review of code and automated application security testing.
  • Increased efficiency & quality: Security issues are detected and remediated during development phases which increases the speed of delivery and enhances quality.
  • Enhanced compliance: In DevSecOps, security auditing, monitoring, and notification systems are automated and continuously monitored, which facilitates enhanced compliance.
  • Increased collaboration: By integrating development, security and operations, DevSecOps fosters a culture of openness and transparency from the earliest stages of development.

SNP’s Approach to DevSecOps:

SNP Technologies, leverages Microsoft Azure to implement a DevSecOps framework that focuses on services like:

  • Vulnerability assessment and threat investigation.
  • Automated code analysis and review.
  • Secure releases of CI/CD pipeline.
  • Huge cost savings.
  • Scalability and improved resilience by deploying microservices and containers.
  • Automated security and monitoring for enhanced compliance.

DevSecOps Implementation:

Infrastructure Security

  • This is an access control and centralized authentication mechanism.
  • Role-based Access Control (RBAC) is required for secure access to clusters and namespaces with identity managed at the container level to grant secure access to specific Azure resources.
  • Ingress controllers can be used to define internal IP addresses, so services are accessible internally.
  • Network isolation can play a key role as network policies are used to manage pod-to-pod communications or from an IP outside of the cluster.
  • Data is encrypted between apps and services; this includes both data in transit and data at rest.

Container/Pod Security

  • Pod managed identities are leveraged to secure and authenticate images and other resources in the container registry.
  • Credentials are requested and retrieved from digital vault/key vault.
  • Isolation is done at pod level security policies which enables fine-grained authorization to pods using pod security to limit access and services.

Security Management

  • Manual errors are eliminated by integrating security scanners, running security static analysis tools and scanning any pre-built container images in the build pipeline.
  • Security events on the cluster are monitored for attacks with log analytics integration.  

Why SNP?

At SNP, we help you choose and implement a right DevSecOps solution which aligns with your technology roadmap. For more information, contact us here.

SNP Collaborates with Citrix to Deliver Graphic-Intensive Solutions on Citrix Cloud and Azure

In the ever-changing IT landscape, Citrix is pushing the limits of what’s possible for our customers and partners. It’s exciting how we’re helping them use our technologies, from moving workloads to the cloud, thinning down endpoints, and tweaking our ICA protocol to maximize graphics performance.

Take one of my Citrix Service Provider partners, Connecticut-based SNP Technologies. I worked with them throughout the first half of 2019 to create an offering in the cloud that they have brought to market successfully. SNP is an entirely cloud-focused CSP, and in this blog post, I’ll share their use case and the technology they used to accomplish their goals.

SNP Technologies came to the Citrix CSP team with one goal in mind — to verticalize and go to market targeting high-end architecture, design, and engineering firms. They wanted to tackle two pain points for this niche market:

  • Minimize cost as endpoints with built-in graphics cards are expensive
  • No central way to manage and maintain security on any of the data created on these endpoints

In partnership with SNP Technologies, Citrix devised a plan to tackle these issues, leveraging the latest technologies from both Citrix and Microsoft. How did we do it? Let’s take a look at the technology landscape:

Technology in Practice:

Architecture, design, and engineering firms use graphics-intensive applications such as AutoDesk and SolidWorks, which require more than the average amount of hardware resources to operate properly. As a 100 percent cloud-focused partner, SNP Technologies naturally leveraged the Citrix Cloud Virtual Apps and Desktops service which helped in the following ways:

  • Saved on compute costs and the cost of deploying and maintaining a Citrix environment.
  • Onboarding new customers is easier and seamless.
  • SNP used GPU-enabled Azure N-Series VMs running Windows 10 to deliver the best user experience for their customers.
  • Each end user gets a high-end Windows 10 desktop in the cloud, pre-installed with the applications they need to get their work done, all while keeping the data locked down and secured from one management location.

Taking a quick glance at the cost of compute on the Azure side for the N-Series VMs, one might think, “How is this solution viable from a cost perspective?” Citrix was able to help decrease the Azure compute cost dramatically for SNP Technologies by leveraging our Autoscale feature, exclusive to the Citrix Cloud Virtual Apps and Desktops service. Autoscale enables proactive power management of machines based on load, a schedule, or a combination of both. It also supports many VDA hosting platforms, including Microsoft Azure Resource Manager. Autoscale supports SNP Technology’s 100 percent cloud-first approach, doesn’t require on-prem installations, and is built in to the Virtual Apps and Desktops service at no additional cost.

Enabling an Optimal User Experience:

Citrix graphics policies were tweaked to enable an optimal user experience. One benefit of partnering with SNP and  Citrix is that we have a team dedicated to creating graphics policies for all types of deployments. After many testing cycles, here’s what we found to be optimal:

Optimize for 3D Graphics Workload

  • This setting configures the appropriate default settings that best suit graphically intense workloads and should only be used when a GPU is available to the session.

Hardware Encoding for Video

  • This setting allows the use of graphics hardware, if available, to compress screen elements with video (H.264) codec.

Setting the Video Codec for Compression for the entire screen

  • This setting allows use of a video codec (H.264) to compress graphics when video decoding is available on the endpoint. Select “For the entire screen” to optimize for improved user experience and bandwidth, especially in cases with heavy use of server-rendered video and 3D graphics.

Setting the Target Frame Rate at the maximum of 60 Frames Per Second

  • This setting specifies the maximum number of frames per second sent from the virtual desktop to the user device. Setting a high number of frames per second improves the user experience but requires more bandwidth. By default, the maximum is 30 frames per second.

Setting Visual Quality to high

  • This setting specifies the desired visual quality for images displayed on the user device. We found that “high” worked best for our use case, and we recommend that if you require visually lossless image quality.

Graphics Status Indicator set to enabled

  • This setting will configure the graphics status indicator to run in the user session. This will allow the user to see details on the graphics mode in use, including graphics provider, encoder, hardware encoding, image quality, progressive display status, and lossless text.

Please note, depending on the specific application and use case, policies will need to be tweaked. We recommend working with your SNP or Citrix engineer to determine what best fits your needs.

Finally, from a technology perspective, SNP Technologies leveraged the Citrix Gateway service, which is included in the Citrix Virtual Apps and Desktops license. Citrix Gateway has points of presence (PoPs) all over the world, enabling users to connect to the nearest location. SNP Technologies was able to include features like high availability and global server load balancing in their branded solution for their end customers without having to stand up or configure complicated networking architectures.

This deployment was exciting because we were able to break down barriers and show what’s possible with cloud, creating a solution that can be deployed in a matter of hours, which just wasn’t possible before. As a result, SNP Technologies’ onboarding of new customers has become seamless and almost effortless. The power of Citrix and Microsoft has reached new heights, and this deployment is proof that if you aren’t thinking about a cloud-first approach, you’re missing out and you’ll probably get left behind in this ever-changing market.

This blog is authored by Neir Benyamin, Partner Sales Engineer at Citrix and Co-authored by Raviteja Beeram, Cloud Solutions Architect at SNP TechnologiesRead the complete blog here.

For more information on SNP’s graphic-intensive solutions on Citrix Cloud and Azure, contact us here.

The Azure Customer Immersion Experience: What it is and Why You Need it

Do these thoughts describe your company’s Azure cloud adoption?

  • “Cloud knowledge is essential for IT and Development on-boarding”
  • “Our teams need to get up to speed quickly”
  • “We don’t know where to start”

If so, you probably need a facilitated training on Azure cloud technologies, and the means to this end is a Azure Customer Immersion Experience, or CIE for short.

In my prior blog post, I shared 5 Tips to Discover App Innovation on Azure as a short guide to help you acclimate to the Azure cloud, with tip #3 being to “Schedule Customer Immersion Experience (CIE)”. If the sentiments I opened with above ring true, my advice is to make the CIE a high priority.

Unlike the other four tips, the CIE is a facilitated activity, as opposed to a task that relies on individual initiative. Individual initiative is difficult to track and manage, whereas with a facilitated activity you ensure that the right people are scheduled at the right time to get the right Azure training to meet on-boarding needs.

For this reason, I wanted to dedicate a full blog to tip #3.

If you have not read my prior post, I recommend you have a look at 5 Tips to Discover App Innovation on Azure, particularly tip #3, and then return to this post.

About the Microsoft CIE program

The Microsoft CIE program is an innovative training approach that favors hands-on experiences over lecture. The leader of the CIE is referred to as a “facilitator” or “emcee”, as opposed to an “instructor”. Each CIE has an over-arching topic, such as “Managing Infrastructure” or “Application Innovation”. Hands-on lab or hackfest style workshops are the training modality.

Labs for the Microsoft CIE program come from a pool of Instructor-led Labs (a total of 83, as of this writing).

The facilitator briefly introduces the CIE material and then fosters a conversational walk-through of the workshop content. Attendees are encouraged to work together and contribute to the conversation.

Facilitators are Azure knowledge workers (such as myself) who enjoy the opportunity to lead their peers through a great learning experience. The Facilitator is not necessarily an expert on all topics covered in the workshop. But this is the point of the CIE. Everyone who attends has the opportunity to share their experience, brainstorm and ask questions that the group can respond to.

To become a CIE facilitator, one participates in a three-week course and presents a customer immersion experience as their final project.

SNP’s CIE approach

At SNP, we take a hybrid approach to CIE delivery. For one, we favor a little more lecture, but certainly short of “death by PowerPoint.” We also curate workshops from a wider array of lab material produced by Microsoft and some home-grown. That is, we do not confine ourselves to the aforementioned list of labs at https://www.microsoft.com/handsonlabs/instructorledlabs.

Our CIE engagements have a single SNP facilitator. As well, SNP engineers participate as proctors to assist attendees and offer their unique technical insight.

At the onset of the CIE, attendees are provided with a virtual lab environment with all Azure resources required for the CIE. These lab environments are furnished by Microsoft at no additional cost, and are available for the day only. As the lab environments expire, customers often elect to use a company Azure subscription or the individual MSDN subscriptions of attendees. In such cases, prerequisites are furnished several days before the CIE. Typical requirements are:

  • Azure subscription
  • Azure DevOps Organization
  • Visual Studio Code
  • Visual Studio 2017 or greater
  • Git

An Example CIE for Azure Kubernetes Service

In the 5 Tips blog eluded to earlier, I summarized topics covered in an “App Innovation with Azure” 2-day workshop. To mix things up, the following CIE example targets IT and Development professionals interested in a one-day immersion into Azure Kubernetes Service (AKS), Microsoft’s managed service for Kubernetes.

This workshop takes a challenge-based approach wherein attendees are expected to work together in small “teams” to solve “challenges” including:

  • Kubernetes cluster deployment with AKS
  • MongoDB deployment on AKS
  • Setting up Azure Container Registry (ACR)
  • Packaging front-end and back-end applications as Docker containers
  • Pushing the containers to ACR
  • Use Azure DevOps to set up a CI/CD pipeline to deploy the containers on AKS
  • Scale the application
  • Monitor container performance with Azure Container Health
  • and more

The feedback from attendees of this CIE has been excellent. The collaborative format and workshop guidance is suitable for novices and those with intermediate knowledge of Kubernetes and Azure.

In Closing

As an IT professional selling cloud solutions for a living, I know that Azure can be intimidating but it doesn’t have to be. There is much that you can do on your own to get-up-to-speed, and the assistance of a Microsoft Partner such as SNP accelerates the establishment of a production-ready Azure ecosystem for your workloads.

Customer Immersion Experiences are an important tool to employ as you adopt Azure, and also to learn new Azure cloud technology that emerges on an annual basis.

Lastly, the good news!  For some qualified organizations there are funding opportunities for either the CIE itself or for next steps coming out of the CIE – pilots, POCs, etc. So, if you want to learn more, give us a call to schedule a CIE today. 

5 Tips to Discover App Innovation on Azure

“How can we use Azure Cloud to modernize our applications” is among top asks we hear at SNP from our customers. There are various motivations for the question, from an interest in re-hosting legacy applications running on on-premise servers to greenfield application development initiatives. The person posing the question knows that cloud technology has something to offer, but the territory is unexplored and mysterious.

In this blog, my aim is not to extol the virtues of Azure Web Apps, Functions, Azure managed Kubernetes or other service of the moment. Neither will I convey best practices to solve an application architecture problem with Azure technology. Rather, my intent for these tips is to help lower the veil, so to speak. Follow some or all, and you will find Azure approachable and ready to implement for your application innovation projects.

1. Play in an Azure Sandbox

If you are new to Azure, Microsoft makes it super easy to set up a FREE Azure subscription. And, if you are a Visual Studio subscriber, don’t overlook your Azure benefits.

Once you have an Azure subscription, you’ll have access to the Azure Portal, the management portal for Microsoft Azure. Log in and you are prompted to take a guided tour. It’s short and worth the trip.
 

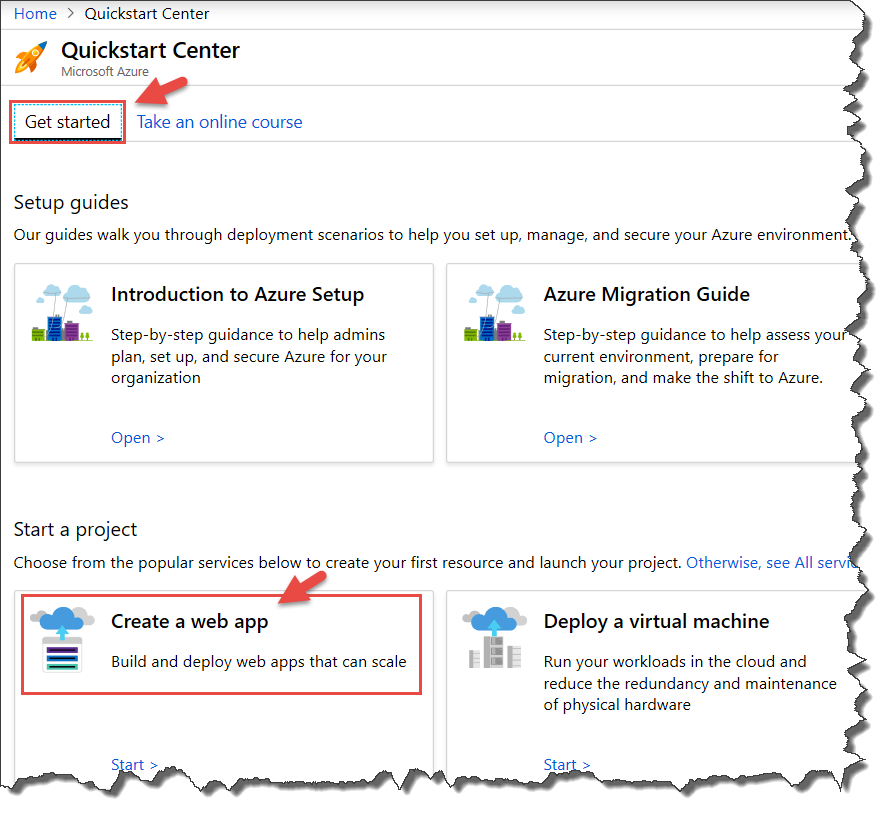
Next, I recommend a visit to the Quickstart Center. In the portal search box, start typing “quickstart” to expose the Quickstart Center link.
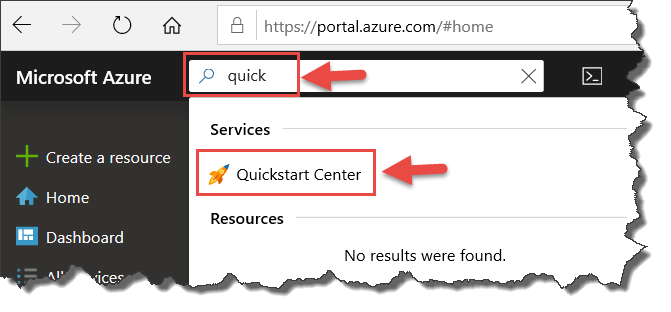
Azure Portal Search for Quickstart Center

Follow the link and review the “Get started” screen. You’ll want to review the Setup guides, but if you are eager to play, dive right into the “Start a project” options. The options do not require an existing application project or database. For instance, select “Create a web app” and then “Create a CI/CD pipeline with Azure DevOps Projects.” With DevOps Project, in a few steps through its wizard UI you can:

  • Create a Web App service (for Windows or Linux)
  • Application scaffolding for a .NET, Node.js, PHP, Java, Python, Ruby, Go or C
  • Create an Azure DevOps Organization
  • Git repository with Azure Repos
  • CI/CD pipeline with Azure Pipelines

Azure Portal Quickstart Center

Note the “Take an online course” tab in the Quickstart Center. This is one of several venues for deeper Azure study. I mention other learning resources in the tips that follow.

While in Azure Portal, my next suggestion to get a sense of the scope of Azure is to follow the All services link on the left menu. From here you can see over 100 Azure service types categorized by domains, such as Compute, Networking, Storage, Web, and so forth.

The groups that are the core of solutions in Azure for app innovation are Compute, Web, Containers, Integration, Internet of Things, Databases, and DevOps. Peer into these service types to get a high-level sense of what Azure has to offer.
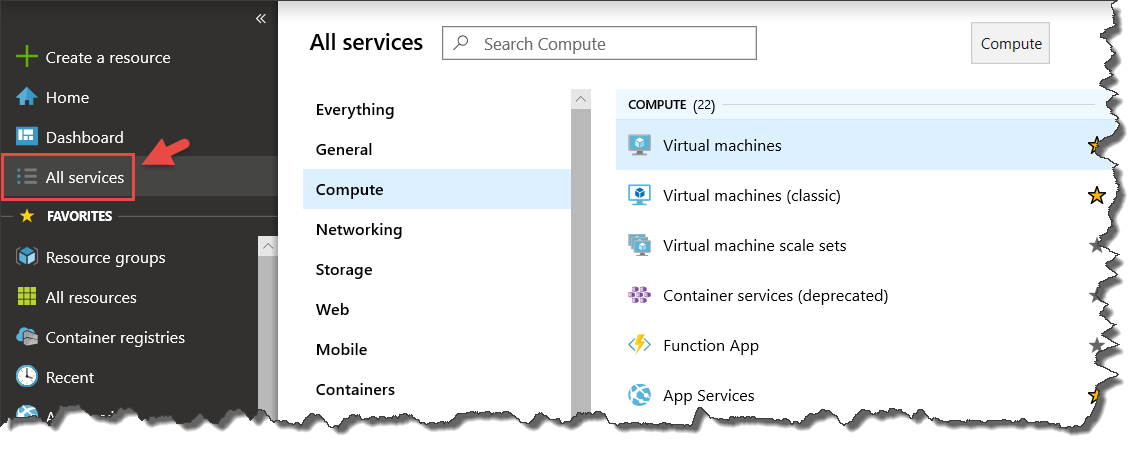
Azure Portal All Services view

2. Explore the Azure Architecture Center

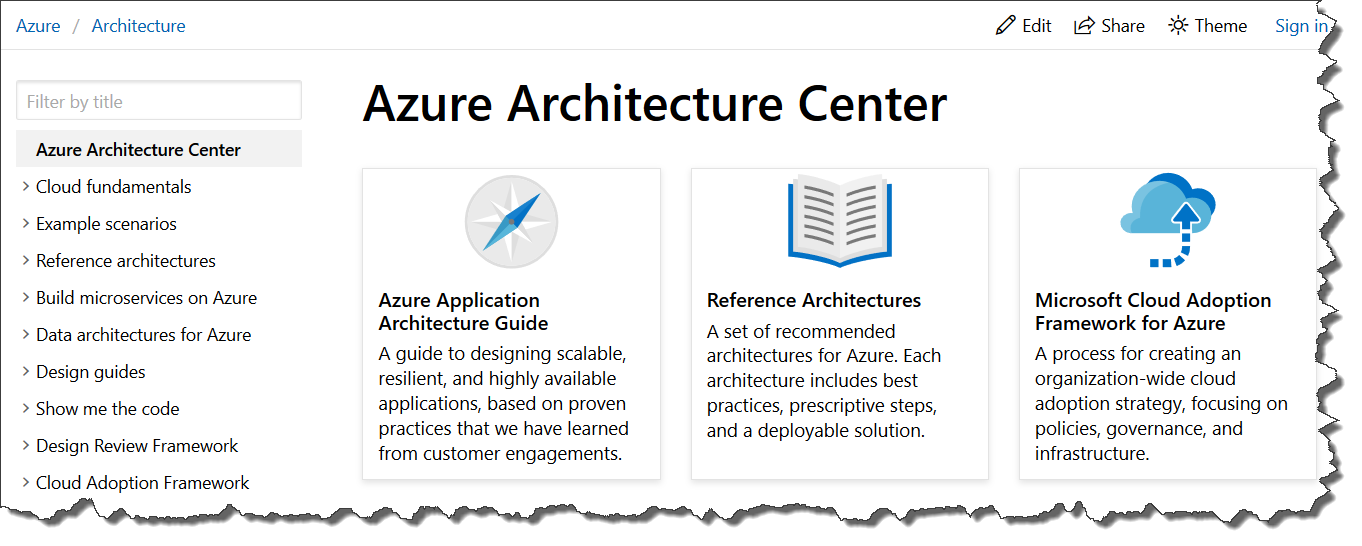
I started our tips with the Azure subscription sandbox, but paramount to Azure app innovation is an understanding of the service tooling and how to apply it. Azure Architecture Center holds the key to learning how to get the most out of Azure.

From the navigation menu on the left and featured links on the home page, we know that this is our go-to reference for:

  • Understanding Cloud fundamentals
  • Review of example scenarios and reference architectures
  • Guidance on cloud native, application design patterns
  • And much more

Azure Architecture Center home page screen capture

After the home page, an excellent place to start is the Azure Application Architecture Guide.

After gaining a foundational understanding of cloud computing and architectures, a primary concern of development teams is to review its digital estate and determine how to go about cloud adoption. There is an excellent set of articles for this, which begins with a favorite of mine The 5 Rs of rationalization.

3. Schedule an Azure Customer Immersion Experience

I’ve saved the sales pitch for this, our third tip ☺

Customer Immersion Experience (CIE) is a program for Microsoft Partners, such as SNP, to deliver hands-on training to software delivery teams. SNP’s expert facilitators can conduct the workshop on-site or remotely. The format is a blend of PowerPoint driven lecture, instructor led demonstrations, whiteboard sessions and proctored hands-on-labs.

For an App Innovation CIE, SNP can deliver a 1/2 day to multi-day workshop tailored to the technologies you work with and the Azure resources that best correlate to your application workloads.

For example, consider the topics below that we cover in our “App Innovation with Azure” 2-day workshop. This workshop targets product owners, developers and system administrators that contribute to the application value stream.

App Innovation on Azure Cloud
Learn the benefits of cloud computing and how Azure services facilitate modernization of application workloads.

Deploy a website to Azure with Azure App Service
Learn how to create a website through the hosted web app platform in Azure App Service. Use the publishing features of Visual Studio 2017 to deploy and manage an ASP.NET Core web application hosted on Azure.

DevOps for Azure Applications
An overview of DevOps practices and their benefits, followed by a guided tour of Azure DevOps, Microsoft’s suite of tools to plan smarter, collaborate better, and ship faster.

Containers on Azure
A synopsis of the benefits of containers for application packaging, and a survey of the options in Azure for container management and deployment.

Azure Dev Spaces
A demonstration of Microsoft’s utility to test and iteratively develop your entire microservices application running in Azure Kubernetes Service (AKS) without the need to replicate or mock dependencies.

4. Do a Hands on Lab

While the structured delivery of training via the CIE model is quite beneficial, Microsoft provides hands-on-labs that can be done at your own pace. The primary resources for app innovation labs are:

Put an “Azure Immersion Monday” on your calendar, where you block out an hour or two for a lab a couple times a month.
Azure hands on lab graphic

5. Azure Podcasts, Videos and Blogs

As technologies, we know how hard it is to keep apace with the latest developments. With some discipline, it is not difficult to keep up with changes in the fast evolving Azure ecosystem. The matrix of resources below helps me and I hope you find it useful, too!

Title Format Consume in… When
Azure Podcast Podcast 30 mins Tuesday commute
Azure DevOps Podcast Podcast 45 mins Wednesday commute
Azure Friday Video 15 mins Monday morning
Azure Source blog Blog 30 mins Wednesday morning


Azure Source is a compilation of content from the prior week. I’ll often bookmark several pieces to review later over the course of the current week. This usually adds another 30 to 60 minutes to my weekly Azure content consumption.

In Closing

As you have read the tips above and started to explore Azure on your own, you have seen the breadth of Azure and understand how to navigate and explore its myriad services. If you have any tips of your own or follow up questions, please feel free to contact us.
Managing Hybrid Identities with Microsoft Azure

Today, businesses are becoming a combination of on-premises and cloud applications. Users require access to those applications which are hosted both on-premises and in the cloud. Managing users both on-premises and in the cloud poses challenging scenarios.

Microsoft’s hybrid identity solutions span on-premises and cloud-based capabilities, creating a single user identity for authentication and authorization to all resources, regardless of location or device.

Azure AD Connect integrates any user who is present or being created in an on-premise Active Directory to Azure AD. This means you have a single user identity for accessing resources present on-premise, in Azure, O365 & your SaaS applications.


Business Benefits of Hybrid Identities:

  • An increase in productivity by providing access anywhere, anytime
  • Create and manage a single identity for each user across all your data center-based directories, keeping attributes in sync and providing self-service and SSO for users.
  • Keep resources productive with self-service password reset and group management for both data center and cloud-based directories.
  • Organizations have complete visibility and control over security and monitoring to help reduce inappropriate user activity and spot irregularities in user behaviors
  • Enforce strong authentication to sensitive applications and information with conditional access policies and multi-factor authentication.
  • Federate identities to maintain authentication against the data center-based directory.
  • Provide SSO access to hundreds of cloud-based applications.


The Three Hybrid Authentication Solutions:

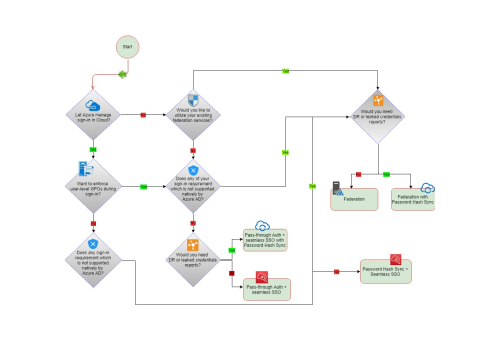
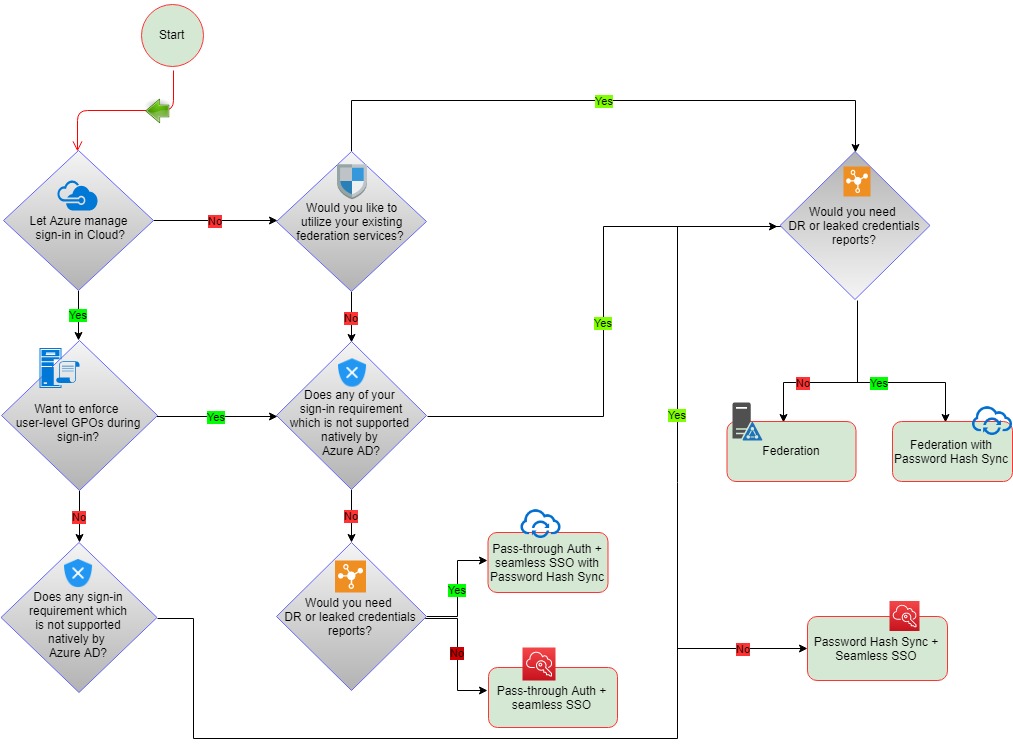
While hybrid identity may seem like a complex issue when it is up and running, it makes accessing data and services both internal and external while collaborating with partners and customers much simpler. To achieve hybrid identity with Azure AD, three authentication methods can be used:


1. Password Hash Synchronization (PHS):

Password hash sync is the simplest way to enable authentication for on-premise AD objects in Azure AD. Users can use their existing on-prem credentials for accessing cloud-based applications on Azure. Active Directory DS stores the password in a hash form which is synced to Azure AD. When a user tries to login to Azure AD, the password is run through a hashing process and the hashed value is matched with the hash value present on Azure AD. If the hash values match, the user is allowed access to the resources.


2. Pass-Through Authentication (PTA):

Azure Active Directory (Azure AD) Pass-through Authentication allows your users to sign in to both on-premises and cloud-based applications using the same password. While deploying the Pass-through Authentication solution, lightweight agents are installed on your existing servers. These agents should have access to the on-premise AD domain controllers and outbound access to the internet. Network traffic is encrypted which is limited to authentication requests only.


3. Federation Authentication (AD FS):

With the Federation authentication method, you can federate your on-premises environment with Azure AD and use this federation for authentication and authorization. This sign-in method ensures that all user authentication occurs on-premises. Azure AD redirects the users to Active Directory Federations Services (ADFS) as the authenticated domain configured as a federated domain. The ADFS server authenticates the user with on-premise AD and returns a security token to authenticate with Azure AD. The configuration of this solution is much complex as it would require one or more ADFS Proxy servers, one or more ADFS Servers and SSL certificates for implementations.


Why SNP?

At SNP, we help you choose and implement a hybrid identity solution which aligns with your information technology roadmap. For more information, contact us here.

Achieve Cloud Native Network Security with Azure Firewall

Cloud developers and IT teams struggle to stay ahead of challenges protecting users, data, and applications from today’s cybersecurity attacks. With Azure Firewall, network security policies can be enforced while allowing companies to take advantage of the scale and simplicity of Azure.


Azure Firewall:

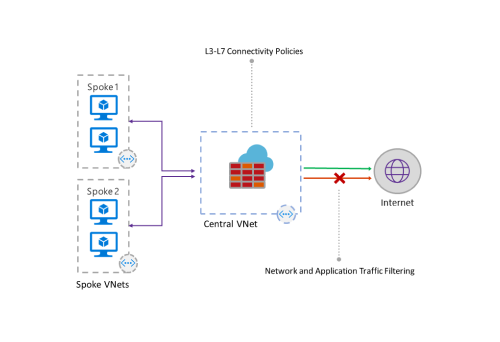
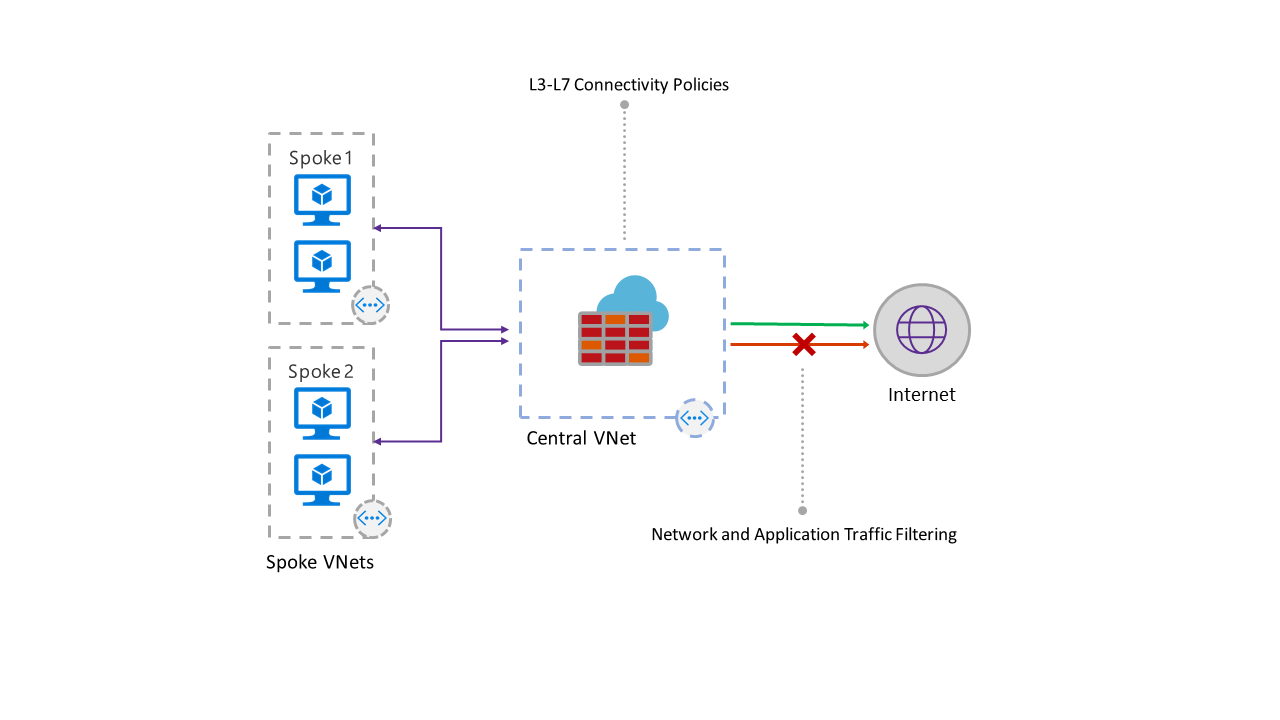
The Azure Firewall is fully integrated with the Azure platform, portal UI, and services. It offers fully native firewall capabilities for all your virtual network resources, and it includes built-in high availability that lets you scale your resources automatically. Azure’s Network Security Groups (NSG) are able to allow/deny and filter TCP/UDP traffic.


How it works:

IT administrators can create connectivity policies using application and network filtering rules and enforce the policies across multiple subscriptions and virtual networks. The new service is built to work with Azure’s existing security services to strengthen and enhance the entire security experience.


Azure Firewall offers advantages like:

  • Built-in high availability: No additional load balancers are required, and there is nothing you need to configure.
  • Unrestricted cloud scalability: Azure Firewall scales automatically to accommodate changing network traffic flows, so IT administrators never need to budget for peak traffic periods.
  • Application FQDN filtering rules: Users can limit outbound HTTP/S traffic to a specified list of fully qualified domain names (FQDN), including wild cards. This feature does not require SSL termination.
  • Network traffic filtering rules: Centrally create “allow” or “deny” network filtering rules by source and destination IP address, port, and protocol. Azure Firewall is fully stateful, which enables it to distinguish legitimate packets for different types of connections. Plus, rules are enforced and logged across multiple subscriptions and virtual networks.
  • FQDN tags: FQDN tags make it easy to allow well known Azure service network traffic through the firewall.
  • Outbound SNAT support: All outbound virtual network traffic IP addresses are translated to the Azure Firewall public IP address (Source Network Address Translation). The firewall can identify and allow traffic originating from a virtual network to remote Internet destinations.
  • Inbound DNAT support: Inbound network traffic to firewall public IP address is translated (Destination Network Address Translation) and filtered to the private IP addresses on virtual networks.
  • Azure Monitor logging: All events are integrated with Azure Monitor, allowing IT administrators to archive logs to a storage account, stream events to Event Hub, or send them to Log Analytics.


For more information on Azure Firewall, contact SNP Technologies here.

Jenkins At Your Service On Azure

If you’ve been following developments at Microsoft during the tenure of CEO Satya Nadella, it is likely you have heard him say “Microsoft Loves Open Source!”

Here at SNP, we did not need to be convinced of the value open source tools bring to our customers. A case in point is Jenkins, an open source automation server that has been a leader in the DevOps tooling marketplace. For several years, Jenkins has been SNP’s go-to software for continuous integration and continuous delivery (CI/CD) pipelines.

For its part, Microsoft is also a Jenkins fan, having an entire section of its Azure documentation devoted to Jenkins on Azure. As well, there are tutorials to cover specific use cases in the Azure context, such as to deploy from GitHub to Azure Kubernetes Service (AKS) with Jenkins.

To get started with Jenkins in Azure, Microsoft provides a guide to creating a Jenkins server on an Azure Linux VM from the Azure portal. This is all well and good, but this requires love and attention to a virtual machine, and that may not be your cup of tea. Jenkins as a service may be more to your liking. For this one can deploy Jenkins on Azure Web App for Containers. (At this time, put on your finest British accent, and repeat after me, “Jenkins at your service on Azure, Madam”.)

In the open source spirit, SNP has contributed a Docker image solution on GitHub titled Jenkins on Azure Web App for Containers. You can fork the Git repo to use as the basis for your own container image.


What follows is a step by step guide to deploy Jenkins on Azure Web App for Containers.

Get the Git Repository

Visit Jenkins on Azure Web App for Containers to clone or fork the repo. Read the README.md file, of course, and review the files in the repository.

Build an Image, Push to a Container Registry

The following steps assume you have Docker installed in your development environment.

In your favorite terminal, e.g. Git Bash, switch to the directory in which you cloned the repository.


At the command link, enter the Docker build command, for example:

docker build -t mikesacr.azurecr.io/jenkinsonazure:v1 .


List images to verify the build:

docker images


Run the image locally, for example:

docker run -p 8080:8080 mikesacr.azurecr.io/jenkinsonazure:v1


Push the image to a container repository. For example, using Azure Container Registry:

docker login mikesacr.azurecr.io -u myusername docker push mikesacr.azurecr.io/jenkinsonazure:v1


Once complete, a sha256 value with a unique identifier for your image is displayed, for example:


This sha256 is also visible in the Azure Portal, for example:

Deploy your Container Image on Web App for Containers

The following steps assume you have an Azure Subscription and an App Service Plan.

Create a Web App for Containers Resource

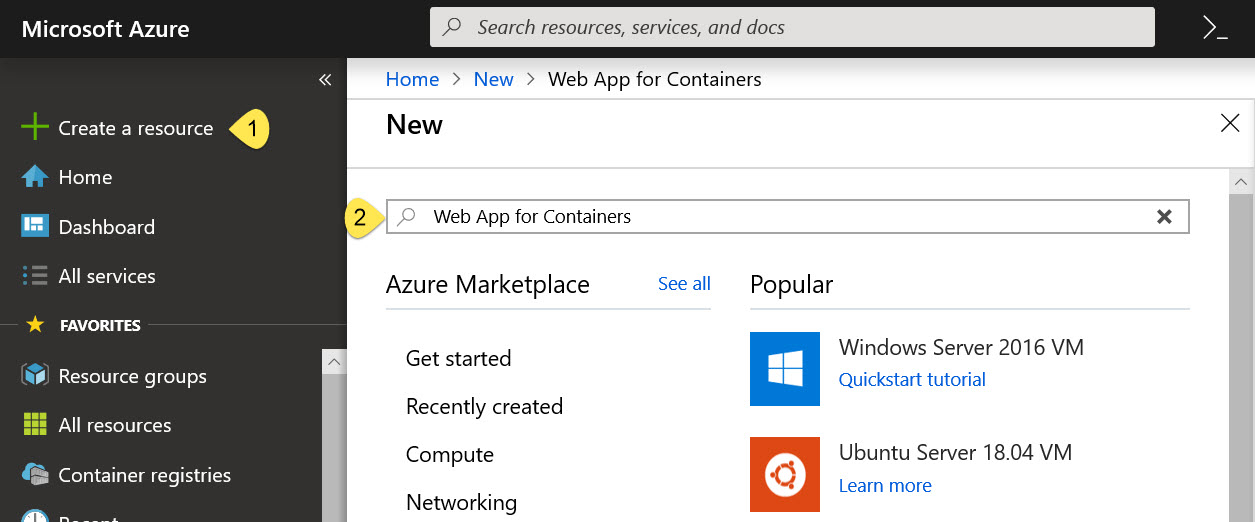
In Azure Portal, click “Create a resource”, then search for “Web App for Containers”:

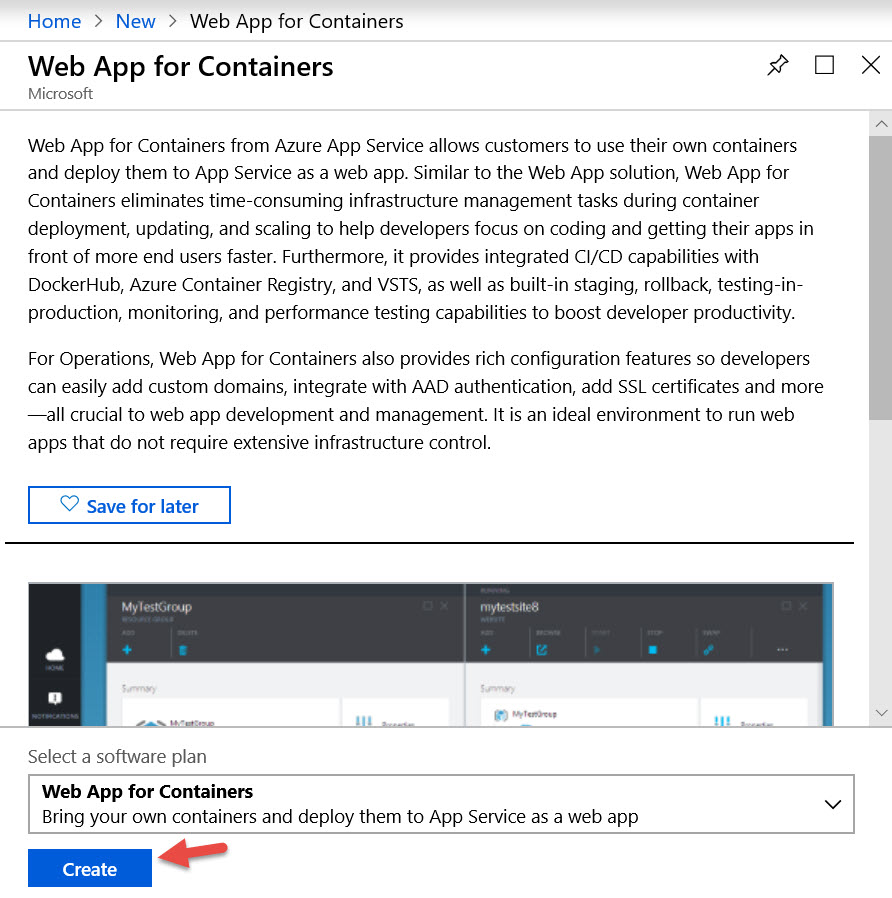
This will open a Web App for Containers resource information blade. Click on the “Create” button at the bottom of the blade:

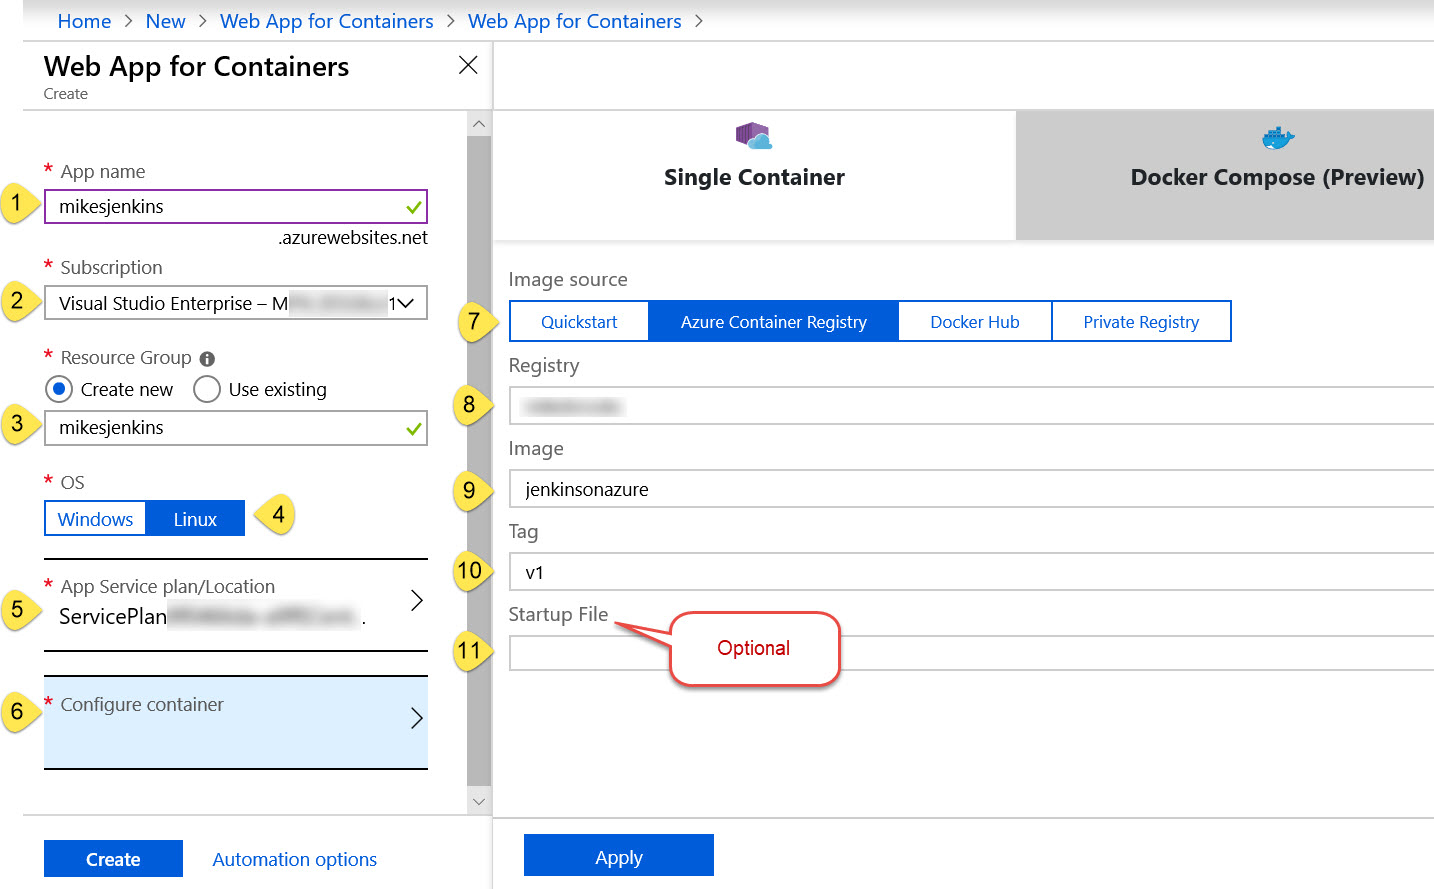
Next, fill in values for the parameters required to create your resource.

  1. Enter a unique App name
  2. Select your Azure Subscription
  3. Select a Resource Group. I recommend a new resource group because the life cycle of your Jenkins app will probably be independent of that of other applications.
  4. Select “Linux” as your OS
  5. Select an App Service plan/Location. If you have not already created a Service Plan, that’s OK. A new one can be created from here. The Service Plan should be in the same region as the Resource Group. Check this list of locations that support the Web App for Containers.
  6. Configure container. Here we identify the container registry and container image to be deployed to the Web App. Click the “Apply” when done filling in this blade.
  7. Click the “Create” button

Note: Alternatively, the preceding steps can be accomplished using the Azure CLI.

When the deployment completes, you should see your new Resource Group and new Web App resource in Azure Portal. Click on the Web App Resource. There are a few steps you need to complete before running your Jenkins application, as noted in the README.md file.

Web App Configuration Steps

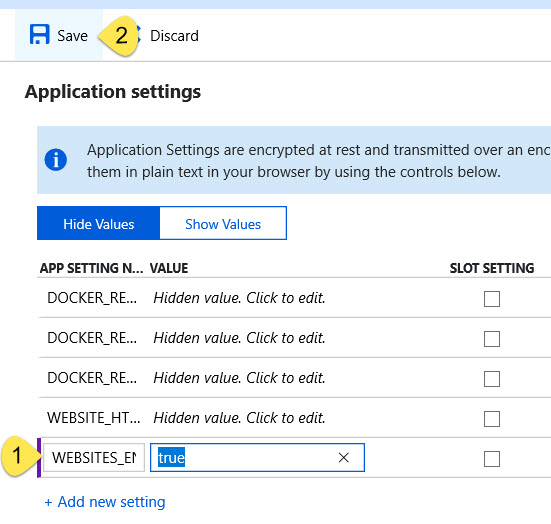
  1. Ensure that the WEBSITES_ENABLE_APP_SERVICE_STORAGE app setting to “true” in the Application settings blade of the Web App.Application setting for WEBSITES_ENABLE_APP_SERVICE_STORAGE
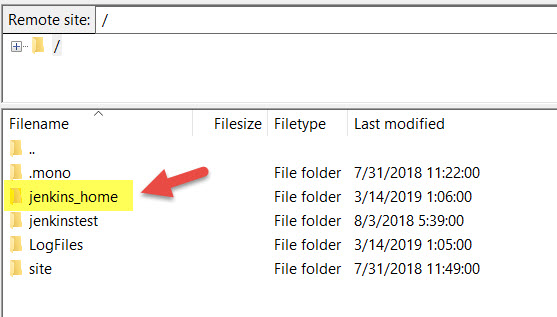
  2. Manually create the jenkins_home directory in the Web App /home directory
    before you run the container and install Jenkins. This can be done from the Kudu Bash screen or from an FTPS session.Screen capture of web app home directory from FileZilla FTP client.

Run your Jenkins Container

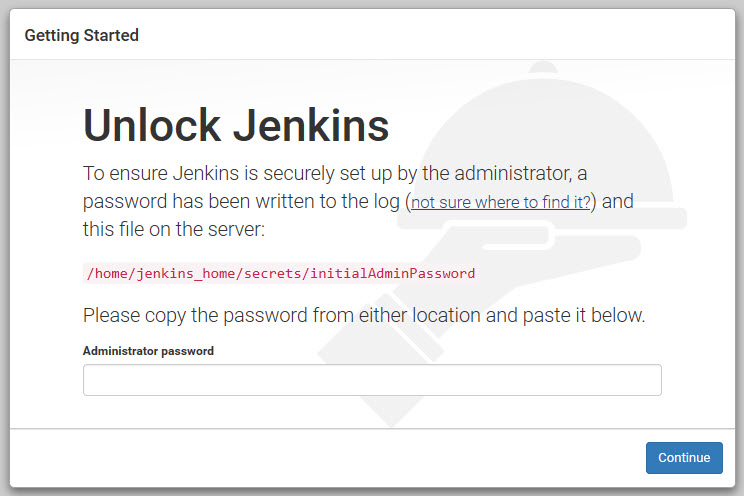
From the Web App Overview blade, click on the URL to run your Jenkins instance. After a brief initialization period, you should be presented with the Unlock Jenkins screen.

You are on your own from here, but keep in mind the “Gotchas” we have documented in the repo’s README.md file.

Jenkins Unlock Jenkins screen

In Closing

If you have questions and suggestions to improve the solution, we are happy to receive issues and pull requests. Contact SNP here.